Today, I must tell you my secrets. About a year ago, the craft store had
Fimo clay on sale for .99 each. At the time I was in one of my bead making phases, and was using a LOT of
Fimo Transparent! So I went Michael's, only to discover that it was sold out. However, I know Michael's does rain checks, so I took advantage of that, and put 20 transparent blocks of clay on rain check. A few weeks after that I got the call that my clay was ready to be picked up~ and wouldn't you know by that time, I was no longer in the mood to make beads! So, I tucked the blocks away for another day. Needless to say, now that I'm in the mood again, it's nice to have all this
pre-bought clay on hand!
Remember the blue beads I made the other day......I was able to make one last bracelet before I realized that I'm out of wire, and crimp beads, and clasps!
Ugggg!

Well, at least I have lots of pretty beads for when I get around to making more bracelets!

Another secret of mine is how I bake my beads. Actually, it's not really a secret, it's just how I do it. I use the toaster oven to bake my beads, so I needed something small to fit in there. I bought a 6inch ceramic tile that works perfectly. Then I used some scrap clay to make the little stands on the ends. Bake those first, and then you can reuse them! I reuse the same ones every time I bake, and they have lasted for a long time.

One day I will learn the secret to keeping the cats out of my clay! It never fails, as soon as I walk away from what ever project I'm working on, one of the cats wants to come along and walk through it. I wouldn't mind so much, but do they have to leave their hair and paw prints embedded in everything?? (honestly, I love the foot prints, I think it adds character!!) I remember when I first learned this lesson, I was about 15. I was working on an oil painting, and made the mistake of walking away........in the 2.2 seconds I had my back turned, my Siamese cat, Ebenezer, went running across my masterpiece. Luckily, he ran across the bottom part of it, so he didn't mess up the painting, but my Mother did not appreciate the paw prints he left across the carpet! From then on, the paintings were stored up high on top of a hutch to dry. The hutch was very tall, there was only a couple of inches between it and the ceiling. LOL, it's hard to find places that cats can't get to!
So, now that you have the background on me 'learning' this lesson.....here's what these cats have been doing to me now......First I was sitting on the bed Sunday night, making beads. When all of a sudden I hear this galloping noise coming down the hall. Something told me to brace myself, so I leaned over the tray of beads I was working on. As I'm leaning over, Otis is in the process of launching himself onto the bed. Luckily, I was able to bend over in time, and he landed on my back~ and I managed to save the whole tray of beads. Last night, I was not so lucky!
Here I am, sitting on the couch this time, with my beads on the coffee table. I was almost done making all my big beads.....about 20 of them, when Pocus comes sliding across the table. And Flips my tray into the air! Yes! My poor unbaked, just rolled out beads went flying everywhere! Needless to say, I spent the next 2 hours trying to pick out all of the fibers that had attached themselves during the tragedy. I spent 2 hours picking out fibers because it took me less time to do that, then it did to roll out all those darn beads. They turned out OK, so I guess my time was well invested!

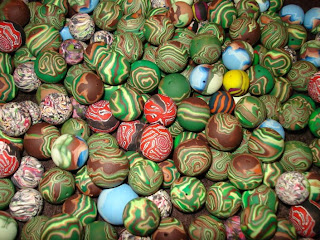 This is just a small portion of what I've done in the past week. I'll put it this way, I now have a gallon size zip lock bag full of beads! Once I get more materials, I plan on making LOTS of bracelets!! But for now, I must find something else to work on.......
 Next, I rolled each portion into a ball and made a valley in the middle of each. Then I added the numbered amount of drops of Adironack Alcohol Ink (I used the color Cranberry) to each section.
 Next, mix up each section of clay and make sure you keep them in order~ from lightest to darkest
 I wanted a little more color in them, so I went back and added the numbered drops to the last 3 sections.
 Again, mix each section to blend in the ink.
 Once you have them blended, roll each color out using the largest setting on your pasta machine.
 In this next picture I sliced off the ends to make them the same size. Then I numbered them on the paper from lightest to darkest. Skipping the first one, I painted each of them with white acrylic paint. And then WAITED for the paint to dry!! If not you'll end up smudging paint all over your beads in the last steps.
 Once the paint has dried, stack the slabs of clay on top of each other from darkest to lightest. Make sure the painted sides all face up and that the last slab is the paint less slab......you don't want paint on the outside of your built stack.
 Once you have them stacked, use your acrylic roller to roll out the stack a little. Pick it up and turn it over, and roll on that side as well. Roll in all directions, but don't roll it too thin.
 Once you get it out, start rolling it on it's side. I think the picture does a better job explaining it then I would in words........just make sure that when you roll it, you keep the light side on one side and the darker side of the bead on the other. Don't worry if it's hard to see your lines, they'll come out brighter when you bake them!!
  The bottom row of beads is the color I used in this tutorial...see how the color deepens when they bake?
 Good luck and let me know if this helps!!


