Wednesday, June 30, 2010

I Got The Basket Bug Now!

Remember the basket tutorial One Inch Minis' http://1inchminisbykris.blogspot.com/
posted a few days ago....Yeah! Well, now I hooked on making baskets! LOL.

Well, let me tell you the story! Remember this dresser?? Kim from http://flowerkim.blogspot.com/ had suggested I make baskets to go in the dresser, and I couldn't agree more. So when I saw the tutorial, I thought how perfect! So, I made one, painted it instead of staining it.......and really liked it. Then I decided to make a couple to go on the bottom shelf.....So I 'wove' 2 up, and realized they were too little, so I made them into one inch square baskets (the 2 on the top shelf)...... Then I made 2 more (they're the ones in the bottom picture)....and they were too big. So, determined to get 2 baskets made that fit, I made the 2 you see one the bottom shelf of the dresser! Now that I have 7 baskets.....LOL...I gotta figure out what to do with them.

.....After I realized these were too big, I added the handles......I also aged the bottom one.


So............Now I gotta find something new to keep my mind busy...maybe I need some smaller baskets?! LOL
Until Next Time!

And then there was 2...

My daughter, Cora, turned 13 on Sunday, so now I have 2 teenagers! All I can say, is I'm glad I only have one girl, I don't know how in the world my parents raised 3?!!

So......no more Tinker bell's, No more Bratz.......Now it's on to Black cakes!! Yes, she picked this cake out, all by herself. The cake lady and I tried hard to convince her that she needed a rose or 2.....but not my Cora! She just wanted a plain black cake with a red border! .......The bakery even called me the morning of her party to make sure they were reading the order right, LOL...... Cora had Eclipse plates and napkins.......so natural a black cake fit into the mix. However! Let me warn you now......Black napkins and a black cake, make for a really black face and teeth! Poor Grandma......She just kept saying, 'I don't know why it didn't get you guys like this?" It was the funniest thing!!! ((And, Yes, I have pictures, but we as a family have decided to keep those private for fear of embarrassing Grandma! LOL...She knows we love her!!!))


And here's my baby opening her Mad Hatter Doll! I started a collection of collector dolls for her when she was a baby......And I plan on continuing this tradition, as my Mother did with me! (One day I'll have to take a pic of Mom's dolls! There's some really amazing ones in her stash!)


Thought you all might enjoy a pic or 2 of the kittens.....I loved how both of them were screaming for their Momma!! Isn't he just soooo cute with his crossed eyes and fuzzy hair!


This one in Cameron's hands is a little porker! He's bigger than all his siblings....

Until Next Time......

Sunday, June 27, 2010

Something new to try......

A little while ago, I promised you a tutorial.....

I'm sure by now, you've seen the jugs that everyone has been making.....the ones that originally came form Marlies's blog. You can find it here: http://marliesminies.blogspot.com/2009/03/pattern_13.html

We'll, the other day I got the idea that I wanted to see what else I could do with paper, so I went on a hunt for an idea. In the Summer 2010 edition of Flea Market Style, I found a little bird house that I knew would be perfect to do in paper! ~This is what I came up with:


And it's soooooo easy! You ready, all you need is some paper, a quarter(or similar sized coin), glue, scissors and paint. Oh and a piece of thin wire for the handle.

Trace the quarter onto a piece of card stock(thick paper, scrapbooking paper, ect)...cut it out, fold it into 4, and then cut out 1/4 of it. This will be your pattern. Trace around it onto another piece of paper, and cut out. Curl the paper around the end of a paint brush, and then glue the paper into a cone shape.

Then I fooled around with the cylinder (The rectangle piece of paper with the star cut out) until I found a size the I like and glued it together. Then I glued the smaller strip into a circle, and then glued the circle to a piece a paper...... At this point, you'll have 2 pieces to paint. I painted the paper with the circles glued to them before I cut them out. Paint both the inside and the outside of the birdhouse several times, to build up the strength of the paper.


Cut the circles out and paint the bottom and the sides


Then glue the birdhouse inside of it's base....

The hook is just a piece of wire that I twisted up and glued to the top.... Once the glue dried, I painted it silver, then dry-brushed it white to match the rest of the birdhouse!

I gotta tell ya! I love these!! And there's so many things you could do with them. You could paint flowers on them, you could use grommets as the hole.......think of the sizes you could make. I'd love to see what you come up with!!!

((In reference to the last pic, I have a question! That dresser that everything is sitting on needs knobs, any suggestions as to how I could make some...I need a lot! LOL And should they be aged or brand new??

Like the wood bird house? LOL. I tried to put my pinkie finger inside it to paint the house and it spilt it up the front. The bf said it adds characters!! I think I agree!))
Until Next Time........

Keeping the Kids Busy, Part 2

Early in the week, Cora informed me that she wanted to have a "Make your own Creature Day", so....I went through my big box of clay scraps, and donated to the cause. The kids had a lot of fun, and it kept them entertained for several hours!

Cameron made an Elephant and a Pig. Love the color in those ears Buddy!

Drew made a dragon.....see the little spikes on his tail!

And Cora made 2 cute 'creatures'! I love how you mixed the colors up for a marbly dino!


One afternoon, I got the 'bright' idea that I'd take them to a park and let them run off some energy. LOL, I'm slowly getting the hint that my babies aren't exactly babies anymore. They lasted 5 minutes on the playground. Hahaha....I will give them the benefit of the doubt here though, and tell you it was Hot!! I was in the shade and ready to go too! Of course though, we couldn't leave the park until Cameron climbed a tree....or 2! My little monkey just scurries right up!!


My daughter on the other hand, had to have some help! What a good big brother Drew is!


Look at her laughing! That's my princess!! LOL


While I was there I found a tree that I want my tree house to look like! I love all the roots! Now I gotta figure out how to reduce it! ((I have the base of my house drawn out on some foamcore board, and the bf is already freakin' about 'Where's that gonna go', LMAO!! ~'Right over there', I say, giggling))


Another event that the kids love....Monopoly. I don't play this with them, because it stresses me out! LOL. These guys spend a lot of time 'discussing' the rules...the money...who's turn it is....who's got what money where....who's buying what....It's horrible! But they love it, And the bf loves to 'debate' so he fits right in! LOL


**Cost for the week: $0 :)

The Garden....

This is the first year in a loooong time that I've been able to enjoy my garden. And has it been good to me!! See my Monster blackberries!!


And my Day lilies! These are my favorite. When I moved in, about 8+ years ago, I planted 3 flowers in this flower bed....


.....and now look at it! Beautiful! One can't help but to smile when you walk into the yard and get greeted by these!!


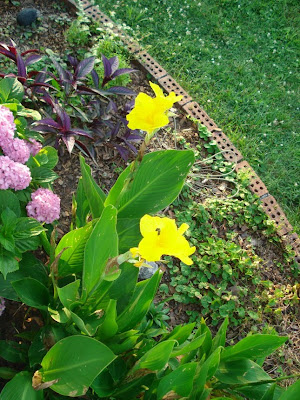
OK....now these guys....my Canna lilies are quite annoying. I planted them eons ago, too......and last year was the first year that one, Yes just one, bloomed.....LOL, this year we're moving up in the world with 2 blooms, Hahahaa!! I think I know what the problem is, I just figured it out a little late in the season. For one there 'roots' want to be at ground level, not buried...and 2, they need A Lot of sunlight!!! Maybe next year I'll get 3 blooms!


And last but not least.....here are the bf's Orange Crush roses. We were afraid they wouldn't bloom this year, but they fooled us! There's so many blooms, it won't stand up. It really needs a trellis!

Be back soon with a few more blogs!

Saturday, June 26, 2010

Come see my new chair!!

It was just a couple of days ago when I won a blog giveaway from Jody at:
So...today, when I pulled back the curtain to take a picture of something else....I noticed a box sitting on my front porch..........and new right away what it was! Oh Jody! It's beautiful! I just love the material on the chair...and the 2 birds on the Perfectly sewn pillow! The flowers are amazing! I love all the color you got into them! Those peaches look good enough to eat! Love my table~ like the width on it! I can fit a lot of nick knacks there one day. I must say...it was a pleasure to receive such a wonderful giveaway from someone who I've been blogging with since I started blogging. I've always admired her paintings on Etsy....and her chairs, and Now am so proud to have one in my collection!! Thanks again Jody!!!
((Go check out the picture on her blog, it's much better~ Mine was taken in the evening sun light!))
Until next time......

Monday, June 21, 2010

Keeping me busy!

My mind has been on over load, so I've been trying to keep it busy making things......

The images were stickers, and I just painted the inside black to stand it. I did them in white first, but they didn't make the bold statement I wanted them to..... and now the do.


I made some 'Nikki' inspired mushroom jugs for Marshmallow Manor....


.....and what would a collection be without a dragonfly jug?? Mercedes sent me this sticker a long, long time ago.....glad to finally be able to use it.


I made some silver ones. These would be perfect for Ara's Addams Family, or Kate's Sweeney Todd room, and would even look good in one of Sans dolls' hands!


Here's to show you how little the little ones are. I have a real collection of jugs in my own home.....I have big colored ones.....and a bunch of white creamers. There's just something about pottery that I Love! So it would only be natural to have some in my miniatures, too. The base of this jug was made from a bead.


Very girlie, don't you think??


So lets talk about the hutch that it's sitting on. It's another gift that Mercedes sent me some time ago. This past weekend, I sanded it down, painted it this baby teal color, white-washed it, then sealed it.......and somewhere during the drying cycle......it ate the paint back off. The bf says it make it look older like this, but I was really wanted to get rid of that red!


And this is the other project I worked on this weekend. It was a dresser that once lived in Cora's first house..... Over the years we lost a drawer, so I decided I'd take all but the top drawer out and paint it. I sanded it first, then painted it, then sanded it down again. I haven't sealed it yet, because I didn't want it to run like the other one did. I think with this one, I will use a spray sealer, and hopefully it will look the same when I'm done.

I really like how this one turned out!

And another view........
So, that's about it for now......

I'll be back some time soon with a new tutorial. Just have to get it right first!
Until Next Time..........