***I say 'One more for the road', because tommorrow I'm going on vacation. My first real vacation with my kids, and I can't wait!! But, don't worry......I'll be back in a week, with lots of pictures to share! But, for now, I must turn off the computer, put away all my supplies~don't want Otis eating them while I'm gone~ and I must say ..........until next time.
Tuesday, June 24, 2008
One more for the road!
I had rather hoped that I would of gotten a lot further on this box than I did today. But, it seems that either someone or something has run off with my blue tape, or I have hid it on myself. Either one could be quite possible, lol. I originally wanted to put in a wood floor, but then opted for a much easier way. I knew I had seen a sheet of flooring at AC Moore's, so I went to check it out. They had several to choose from, but at almost $24 a sheet, I decided there had to be a cheaper way. I wanted light floors, and thought about cutting out squares of scrapbook paper, but again, too time consuming for me......and then it came to me, CORK. You can buy a 12x24in sheet of it for $2.99......Now that's what I'm talking about. And, you know, I really like it! I put a coat of varnish on it, and will probably put on a few more . I have all the baseboards and moulding ready to go, now if I could just find that darn tape................
Goodbye Cora's House
Well, Cora's first house has now found a new home, in the trash. Honestly, I have spent many of nights, wondering how I could fix and transform this house into something great, it just never happened. And besides, we needed to make room for her new house.
Here she is 'man-handling' it, and trying to pull the second floor off.
Oh, the poor little house............
..but wait..............stay tuned..............a new house is in the process of being built.
Here she is 'man-handling' it, and trying to pull the second floor off.
Oh, the poor little house............
..but wait..............stay tuned..............a new house is in the process of being built.
Sunday, June 22, 2008
The Skate Shop's 2nd Chance.
Look at what I found at the dollar store! It's the perfect size for a miniature TV........LOL~ I bought 6~ Hey, for a dollar, I couldn't resist.
I pulled off the front sticker, and traced it onto wax paper. Then I lined up the 'outline' on the wax paper with a picture I cut out of my son's magazine. I cut out the picture and glued it onto the TV. I also sprayed a couple coats of sealer on it.
When I bought my room box, I also bought one for my oldest son. He decided he wanted a skate shop, and I showed him how to paint the walls, ceiling, and floor. After he painted, he glued a bunch of picture on the walls, and then decided he didn't like it. Well, it has sat ever since........and last night I stole it. LOL, I did ask for permission, and I do plan on making him a skate shop. I ripped out what was left of his 'stickers', and repainted the inside. I also choose a lighter blue. You can see the TV sitting on the floor. It will get mounted in one of the corners. Next, I have to put in a wood floor, and get the trim done.
Thursday, June 19, 2008
For Cora's Nursery
I do a lot of googling, and learn a lot along the way. But I am terrible at writing down where I get the ideas from...I apologize for this.
So, I had seen somewhere how they took an earring and some buttons and turned them into a baby mobile. I thought I'd give it a shot. In the first picture, you will see 2 earrings, a pair of pliers, and grommets. If you look closely, you will see a grommet on the end of the pliers. I did this to show you that if you stick the pliers into the grommet, you can open up the hole a little. You will see that the earring on the bottom has been bent into shape, and then the grommet was added~ you will need to add one grommet to each end.
Here's a closer picture of the earring and the attached grommet.
Next we have another earring. I forgot to mention that you will want to take the backing off the earrings. I used a fingernail file to file down the pointy part. Also....you are going to want to sprat paint all the pieces in the same color. At this point I epoxied one of the grommets to the back of the earring.
After the paint was dry, I began to add the buttons. I took a piece of yellow wire and wrapped one end around the button and the other end around the earring.
I'm not sure if I really like this~ it doesn't look professional, but I think it will make Cora happy. I'd be interested to know if anyone else has tried to make one???
Wednesday, June 18, 2008
Small projects
I took a trip out to the dollhouse store yesterday, and picked up something for everyone. First, I bought this changing table and little cradle for Cora's nursery. I re padded both with the same material I did the crib in. I also glued together scraps of fabric to look like extra sheets and a blanket. I have lots of printies to fill in the gaps: diaper boxes, wipes, ect. (All of her dollhouse stuff is packed away until the new house gets built.) I also picked up 2 more china sets for the cabinet. My favorite is the salt and pepper shakers. It is a shame I couldn't find a small enough teapot to fit in here! You will see 2 little bears on the bottom shelf, they are just here temporally, until I can find something in china that fits.
Ohhhhhh....poor Pocus, she feel asleep watching me watch glue dry. I don't know how she can breath with her nose embedded into the coffee table like it is?!?!
Tuesday, June 17, 2008
Chocolate MIlk????
Remember the fireplace that I ripped out of Cora's old house??
See what it looks like now. I covered the fireplace in paper clay, then sprayed it with American Accents Stone. I still need to make a mantle that I like......LOL...I have made 2 so far that I don't like, haha.
And here is a picture of where I'm at with the pink room. I started filling the China cabinet yesterday, and put a few things on the metal shelf in the corner. I do believe the bunny in the chair will be donated to my daughter's nursery, it's just too big for this room. I still have a long way to go, still not trying to put anything in here permanently until after I get the roof done.
****Oh, I'm also on the hunt for a glass of chocolate milk!! If anyone knows where I can buy one, I'd be very grateful!! Or, if you can suggest how to make one............Or if you can make one, I'll trade you a mini book for it!!!!
Monday, June 16, 2008
Big hands in little spaces:
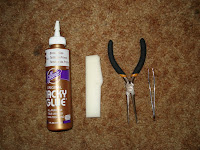
Here are my tools for today. Glue, a piece of foam, pliers and tweezers. I highly recommend the later two when trying to get minis into small places. I was blessed with big, shaky fingers......not good for trying to get something into exactly where you want it. As you can see, I used the foam to prop the doors open. I have started to glue in my dishes...of course all of them have pink flowers!! I'd like to talk to the designer of these things, and ask that the spaces between the shelves be made a little bigger. I really wanted to put some teapots in the cabinet, but none of them fit. I have left a little room, still need a few more pieces. I love the look of it, and how everything is mixed up!!
Sunday, June 15, 2008
The pack rat in me....
A case of severe boredom last night, helped create this floor. (I'll discuss the crib in a minute.) If you look closely at the bottom picture you will see 2 different size tiles. The 1x1 foot tile is in my hall, in my real house. Being the packrat I am, I saved all the left overs from when we tiled the hall. I call it tile, but it's actually the sticky tiles you can buy at Home Depot. I cut them into 1 1/2 inch squares, and stuck them onto a piece of foam board. Not sure where it will go, but I like how it looks. I do; however, need to find a way to fill the little gaps in between the tiles. I thought about shoving some sand in there, but not sure if I like that idea. Any suggestions??
OK, now the crib. I bought a crib set at A.C.Moore's for Cora new house. When I asked her if it was going to be a girl's room or a boy's room, she decided she wanted a boy's room, but really didn't know if that's what she'd want later. So I suggested we do it in green and yellow, that way she could change her mind later. So, tonight, I ripped off the old material, and glued in the new green material. It does have tiny little blue and pink flowers on it......so it will 'work' either way. Take a closer look, and see the 2 different floors.......pretty neat!
Labels:
dollhouse crib,
dollhouse floors,
dollhouse miniatures,
green
Saturday, June 14, 2008
More favorites
I love this time of year, not for the hot, humid days, but for the flowers that are blooming in my garden. Aren't they beautiful?! A few blogs ago, I showed you pictures of a few of my little things. I knew I had more, I just had to find them. Well, I didn't realize I had this many stored away. I did happen to ask my Mom where she got them....and she said it was to long ago to remember, lol. So, I'm still clueless....the only thing I know is they all have a sticker on the bottom that says: Made and hand painted in Scotland.I also came across these little guys. I did find some info online about them. They are made by Wade Productions, in 1981. These are the 2nd set of what was called the Hatbox Collection. I did at one time have all that came with the set, but through the years, some have gotten lost. They stand under 2 inches, and only one is broke. Thumper is missing the tip of his ear. In the picture below there is Big Mama (the owl), then Thumper, and then there is Boris, Tramp and Lady from Lady and the Tramp. ( I had to look hard for Boris, I didn't know who he was, LOL.)
Friday, June 13, 2008
Polymer Clay Tiles
Last year, I started to do a haunted house out of polymer clay. Needless to say, my idea got way out of control, and I couldn't find a way to make it smaller......so I put it away. While looking for the door knockers, I came across some tiles I had made. I used polymer clay mixed with black sand and black embossing powder. I then made a slab, and cut out squares of clay. And then used a rubber stamp to make impressions into the tiles. They might look more uniform if you stamp, then cut!?!?!
These next pieces are what I had wanted to use as my front door piece. The door will fit into the arch....do you see the arch in the bottom of each picture? It is only the top of the arch. The tiles from above were going to be used to build columns to surround the front door. I made 2 because I couldn't decide what one I liked better. I think I still like the one with the lady's head. Poor little house, it longs to be built!
Thursday, June 12, 2008
Fireplaces and Grout
Today has actually been a productive day. Cora's new house has arrived, but I won't be putting it together. The bf has taken on the challenge, and I am very excited to see what comes of it. He has a lot of talent, when you can get him motivated. LOL. We had talked about taking something out of her old house to put into the new house, so she'd always remember it. Not to much of this house is salvageable, so I ripped out the fireplace. Do you see the horrible wallpaper that used to be in this house. Oh, and whoever originally glued the fireplace together, had a GOOD time with the glue. I spent an hour last night trying to scrap it off!!
Once I got it off, I decided that I need to cover the whole thing in paperclay. I was able to fill all the holes and cracks this way. This next picture is me about half-way through the paperclay.
I forgot to take a picture in between these steps....but I went ahead and covered the whole thing in clay. I then spray painted it white.
Once it all dried, I started spraying on coats of the stone spray. The top is still covered with blue tape, because eventually I want to make a nice mantel for this fireplace. I really like how it turned out.......but just wait till I get it done!!
..............and............. I grouted Katie's Corner........finally. I don't know why I was making such a fuss over not doing it. It went quite smoothly. I taped up my lines, and went to work.......
The above and below pictures are before I did my final wipe off.
....ta-da...........
What do you think?? Me, well....I'm impressed with myself! Now that I have done this part I really think this little house needs shingles. Originally I was going to use coconut fiber to do a thatched roof......but due to my own problem with procrastination, I think the shingles will have a better chance of getting finished.....oh, who knows....I may change my mind again, and again.....Either way, I like where it's going
My glass Menagerie
I have this wooden box that I keep my special little things in. Not sure where I got it, just know I remember always having it. Through the years the contents have changed, a little. Some things have got broken, or lost.....and some new things have been added. It is at it's fullest right, due to the fact that I have a lot of things that will go in Katie's Corner, stored in this box.
But for now, I thought I'd share a few of my favorite things with you.....
The first picture is of things I had in my dollhouse as a kid. From left to right, we have a washboard, then there's what's left of a tea set. Next is a little lamp, then a phone. My reindeer rations jar is next~ too funny!! Then there is a dog that goes with another blog. And the last thing is a little plastic stroller.
The blue couch set has been with me for as long as I can remember, as well. I'm not sure of the scale....it is smaller than the 1/12 scale I am familiar with. And it is made of metal....very heavy metal!! Glad I held onto these!
Here is my blue cooking set. Again I have been collecting these for awhile. I started out with a simple plate set, and have added to it. And one of my neighbors gave me a couple pieces when she had to move. I think they need to go in a camping scene!
My neighbor also gave me the 2 gentlemen in the picture below. They remind me of my Dad, he had several bigger ones. I put the shells in the jars, thought they looked good together! And one day, I will do a beach house that will house these.
Monday, June 9, 2008
It's the Little Things....
Most of today was spent daydreaming about all the different types of doors I could make. I googled fairy doors, and was inspired by so many things, my brain hurts. I did; however, break out the polymer clay and make 2 handles for my already done doors. I also added a little more moss at the top to make it look more natural. All I need to do now is find a frame for it, and I think it's done. Oh, I also added another wash of brown paint to the front door to get rid of that boring gray.And my English Cottage is finally done!! LOL~ OK, I've been putting this house off for a year now all because it needed a handle. I had made some, but they were too big. It's crazy what one can procrastinate about! If you'd like to read more about the making of the english cottage, check out my very first blogs....you will also get to see my hobbit hole...one of my favorites!!
Labels:
dollhouse miniatures,
front doors,
paperclay,
polymer clay
Sunday, June 8, 2008
Exploring more ideas
Lets see.....where did I leave off?? I do believe at this point I have added a wash of gray. Just took a little bit of acrylic paint and watered it down.
Next, I added a bottom. I want this little door to have stairs! I have mounted the whole frame onto a piece of foamcore board.....and the added some height to the bottom of it. (This way I don't use so much of the paperclay.) I also learned to not cut my door before really looking at the arch it's going in. I cut it a little smaller than it needs to be.......oops! And of course I forgot to take a picture in between these steps. But as you can see I have built my stairs. (Remember, the paperclay shrinks~ but if you have gaps, you can fill them with 'moss'...I'll explain more later.) I also tried to make some rocks in the bottom corners~ I don't like them~ but they'll do. I broke out my son's watercolors to add a little bit more color to the stones. I wanted them each to look a little different. The lion-head-door-knocker was made out of polymer clay awhile ago...and I think it has found it's home. I also made the 'metal' bands on the door out of polymer clay.
I aged the clay with a wash of gray again, and then wiped off the extra.
And then came time to fill the gaps. I thought I had added enough clay to make up for the shrinkage problem, but I was wrong. Luckily, I had planned on adding moss to this door. And it nicely fills in those horrible gaps. Looking at this picture, I realize I need to blow off some stray foliage. I used the stuff that you can buy in the model train section at the craft store. I used the light green foliage. It comes in a web like form. You can just pull off small strands, and then I rolled them like a snake and added them where I thought they might grow.
And this is where I am at tonight. I still want to go back and add a little more moss around the top...it's not natural enough for me. I also added enough wash of gray...and now wish I had left the door alone. I liked it a little darker.This little door has no special place to go. I just wanted to experiment with the different ideas I have seen. I have a house that will one day need moss, now I can at least say I have some knowledge of how to use it, without having ruined something really expensive. I do think that one day I will use the paper clay again. I love the stone work, and would like to see it on a house. But for now, this door will probally get put into a shadowbox (when it's done), and be just that, a 3D picture of a door.
Labels:
dollhouse miniatures,
faux stone,
paperclay,
polymer clay
Subscribe to:
Posts (Atom)